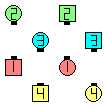
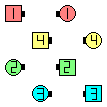
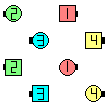
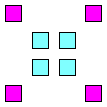
A Block FORMATION consists of two overlapping Boxes of 4.
Typically, one of the corners of one Box is positioned at the very
center of the other Box, and vice-versa. Dancers in each Box work together in
a disconnected setup, independent of the dancers in the other Box.
|
Block FORMATION
Who works with whom in a Block. |
Notes:
-
Dancers must remain in their own Block. At the end of the given call,
each dancer should be on one of the original footprints in their Block.
-
If you connect all four dancers in one Box by drawing imaginary lines
from each dancer to the next adjacent dancer, and then separately
draw lines connecting the four dancers in the other Box, a
Block FORMATION would look like
the familiar interlocking squares that symbolize square dancing.
-
To help identify who is working within your Box of 4, it is customary
to point to the two nearest dancers in your Block. Use one arm to
point to the dancer beside you in your Box, and the other arm to point
to the dancer either in front of or behind you in your Box. It is
important not to turn your shoulders to accomplish this, as you might
forget which wall you are facing or confuse others as to your facing
direction. Therefore, we recommend that you use your closest arm to
point to the dancer beside you (i.e., use your R-H if the dancer
beside you is to your Right; use your L-H if the dancer is
to your Left), and use your other arm to point to the
dancer in front of or behind you. If the dancer is behind you, bend
your arm at the elbow and tuck your hand behind your back to point, so
that you do not twist your shoulders.
-
Within the Block FORMATION there is a diagonal of four
dancers which contains two dancers from each Box. This
diagonal is used as a landmark for re-establishing the
Block FORMATION after completion
of a complicated call. The slant of the diagonal never changes; it
is always either a North-West to South-East or a South-West to
North-East slant.
-
Blocks are alternatively known as Interlocked Blocks or
C1 Blocks.
Calls done within your Block must require 4 or fewer
dancers to do the call, and must start and end in a 2 x 2.
Shape changing calls are not allowed.
At C1, the caller often gets the dancers into Blocks from Parallel Waves by
saying: 'Leads Press Ahead (& Trade), check Blocks'. Then, after executing a series
of calls in Blocks, the caller may get back to normal Lines by saying
'Outsides Press Ahead to make Lines'. This terminology is problematic
in that technically there are no Outside 4 dancers in a Block; there are 2 Very
Outsides (the Ends of the diagonal) or 6 Outside dancers. A Block is a
four-dancer Box, having no Centers and no Ends. Being partially overlapped by
another four-dancer Box, Interlocked Blocks gives the illusion of being an
eight-dancer formation.
In the Blocks shown below, all dancers except  and
and  could be considered Outside dancers (in particular, dancers
  ,
,
 ,
,
 ,
and
,
and  are all equally distant from the Center of the Set).
To determine who should Press Ahead to make Lines, there are two
things to know:
- You must be facing the center of the set. If you are not facing the
center of the set, you can not move toward it, therefore you are not
active for the Press Ahead.
- You must not cross the center line. If your Press Ahead would put you
past the center line, you are not active for the Press Ahead.
When doing calls within Blocks, traffic patterns vary. For simple calls that
do not require interaction with more than one other dancer at a time, execute
each part of the call within the footprints of your individual Block (e.g.,
Square Thru, Touch 1/4). On more complicated calls (e.g., In Your Block Square Chain Thru),
start the execution of the call to the footprints of your individual Block, and when it becomes
necessary to interact with more than one dancer at a time, the dancers closest
to the center of the set should cross the center line to join the other dancers
in their Block to complete the call on
each side. Once the call is completed, re-establish the Block
footprints by having the appropriate dancers move to re-create the original
slant of the diagonal (i.e., NW-SE or SW-NE) and the other dancers move to
appropriate Block footprints. Note: Some dancers need not move at all to
re-establish footprints (typically, only four or six dancers need to move)!

| before
In Your Block Square Chain Thru | | |

| |

| |

| |

| after
Right Pull By & 1/4 In | | after
Step To A L-H Wave
(removing the Interlocked aspect) | | after
Left Swing Thru &
Left Turn Thru | | after
re-restablishing Block footprints
(done) |
|
The following is a partial list of calls that might be done from Blocks
at C1. These calls start and end in a 2 x 2.
Note: When the given call is a call that normally requires 8 dancers
(e.g., Circulate or Counter Rotate), do the 4-dancer version of that call.
|
Other types of Blocks:

| |

| Inner & Outer Blocks;
also known as Concentric Blocks | | also known as Interlocked Boxes |
|
See also Stagger CONCEPT [C2].
 and
and  could be considered Outside dancers (in particular, dancers
  ,
,
 ,
,
 ,
and
,
and  are all equally distant from the Center of the Set).